
Facebook offers a range of privacy tools that allow users to be very specific regarding who sees what on their Facebook profile.
The current privacy features are great – users had very limited ability to manage who saw what on Facebook when it first came out.
That being said, all of the available options can make it overwhelming and confusing at times.
The video above provides an overview of all of the Facebook privacy settings available, where you can change them and what options you have when changing them.
Alternatively, information on managing Facebook privacy settings is available in print format below.
You may also want to take a look at my short tutorial on how to hide your personal information on Facebook.
To get started, it’s probably best to take a look at your current privacy settings in Facebook.
How to Modify Facebook Privacy Settings
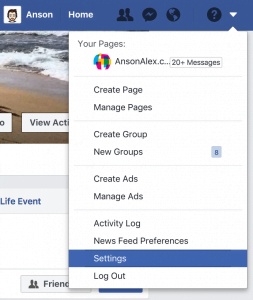
- Click on the upside-down triangle next to the question mark on the top right of your Facebook profile to access a dropdown menu.
- From the dropdown menu, click on Settings.
- From the tabs to the left, click on Privacy.
- For more privacy settings click on Timeline and Tagging or Blocking.
Important Facebook Privacy Settings
Privacy Settings and Tools Tab

This tab is where you can manage who will see posts on your Facebook wall and how easy it will be for people to find your Facebook profile. Some of the more important settings on this tab include:
Who can see your future posts?
This setting determines which users, by default, can see a new post once you’ve posted it to Facebook. You can override this setting by manually selecting the visibility of a post during the posting process.
Review all your posts and things you’re tagged in
Depending on your Facebook settings, when a friend tags you in a post or photo on Facebook, you have may have the opportunity to review the post before it appears on your timeline. You can click on the Use Activity Log button on this screen to review any current posts that you’ve been tagged in.
Limit Past Posts
Clicking on this option will allow you to set the visibility for any post already on your Facebook wall to “friends only”. This is useful for users that don’t want to go through all of their old Facebook posts individually but also want to make sure they haven’t mistakenly posted something publicly that they shouldn’t have.
Who can send you friend requests?
This setting is pretty self-explanatory, it allows you to specify whether anyone can send you friend requests or only friends of your friends – currently these are the only two options for this setting.
“Who can look me up?”
This entire section deals with how easy or difficult you would like to make it for other people to find your Facebook profile.
You can choose whether or not people can use your email address and / or phone number to find your Facebook profile.
Additionally, you can choose whether or not you’d like your Facebook profile to show up in search engine results pages (SERPs). In other words, if someone searches your name in Google, do you want your Facebook profile to show up?
Timeline and Tagging Tab
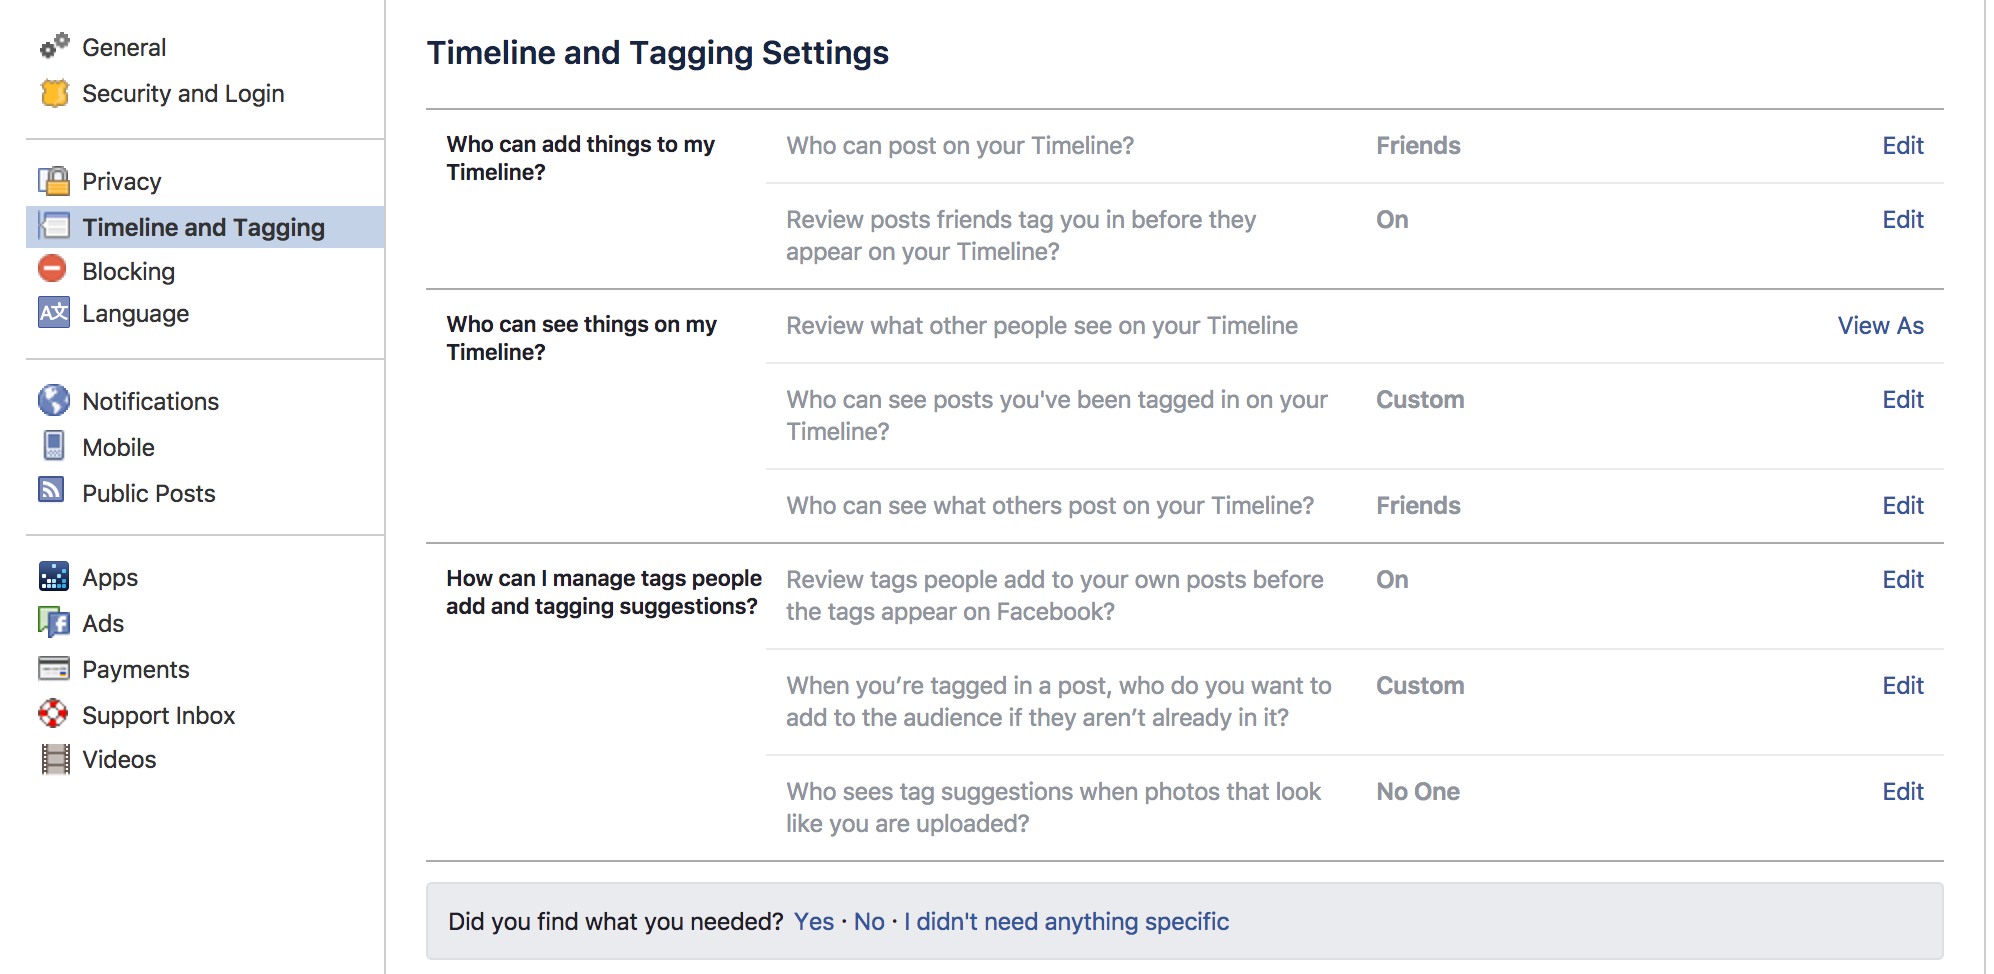
This tab deals with the visibility of posts that other users are posting to your timeline and posts that you’ve been tagged in. There are some really important settings here because you’re limited in controlling what other people do and post on Facebook but this section gives you control over whether or not you’re associated with the posts of others without approval first.
“Who can add things to my timeline?”
The first setting in this section specifies who can post “things” to your timeline. By “things”, Facebook means status updates, photos, links – anything that you could post to your own timeline.
This setting may be useful for some but note that the next setting in this section allows you to review the posts of others before they’re displayed on your timeline. As long as you have that setting activated you can safely allow friends to post to your timeline – knowing that you’ll have to approve those posts before they appear.
If the “Review Posts” setting is on, you’ll receive a notification when a friend has posted to your timeline or tagged you in post and clicking on the notification will give you the option to specify whether or not the post should be added to your timeline.
“Who can see things on my timeline?”
This section deals with the visibility of posts on your timeline.
You can click on the View As button and then select a user to see exactly what your timeline looks like to that specific user. You can also access this feature from your profile page by using the links to the bottom right of your canvas photo.
The next two options allow you to specify whether or not other users can see the posts that others have posted to your timeline and photos that others have tagged you in. Again, if you have review turned on, you shouldn’t have to worry too much about these settings.
“How can I manage tags people add and tagging suggestions?”
As I mentioned earlier, Facebook is certainly not skimping on the privacy controls available to their users.
The settings in this section are very specific, dealing with how you would like to manage the tags of other users on Facebook.
From this section, you can let Facebook know whether or not you’d like to review tags other users have added to your photos before those tags appear to everyone else.
Additionally, you can specify whether or not you’d like your own Facebook friends to see a post after you’ve been tagged in it.
The last setting in this section is probably one of the most important settings in your Facebook account. This setting basically allows you to specify whether or not you want Facebook to recognize you in photos uploaded by other users by using facial recognition. If this setting is turned on, Facebook can recognize you in photos and suggest that the user who uploaded it tag you in the particular photo. From a privacy standpoint, it’s probably best to turn this setting off.
For more information and tips regarding how to manage your privacy settings on Facebook, remember to watch the video embedded in this post.


![How to Hide Personal Information on Facebook Profiles [Video]](https://ansonalex.com/wp-content/uploads/how-to-hide-personal-information-1-232x130.jpg)

