Last updated: Recently
Free Touch Typing Crash Course (with practice)
Touch typing is typing without looking at the keyboard, using consistent finger placement so your hands learn key locations through muscle memory. It’s one of the highest-ROI computer skills you can learn — because it saves time every single day.
If you landed here from search, you’re probably asking:
- Where do my fingers go?
- How do I practice without building bad habits?
- What’s a “good” typing speed — and how long does this take?
This page is a quick crash course + start point. If you want the full structured path (lesson pages + matching drills), use the buttons below.
The only routine you need
10–15 minutes a day is enough if you do it correctly:
- Learn: watch/read one lesson (short and focused)
- Practice: drill the matching keys in TypeDrift for 10–15 minutes
- Stop while accurate: don’t grind when you’re missing a lot — that’s how bad habits form
Rule of thumb: aim for accuracy first (95%+). Speed shows up automatically once your hands “know” where keys are.
Watch: the fundamentals (one video)
This video explains the method, finger placement, and how to practice without wasting time.
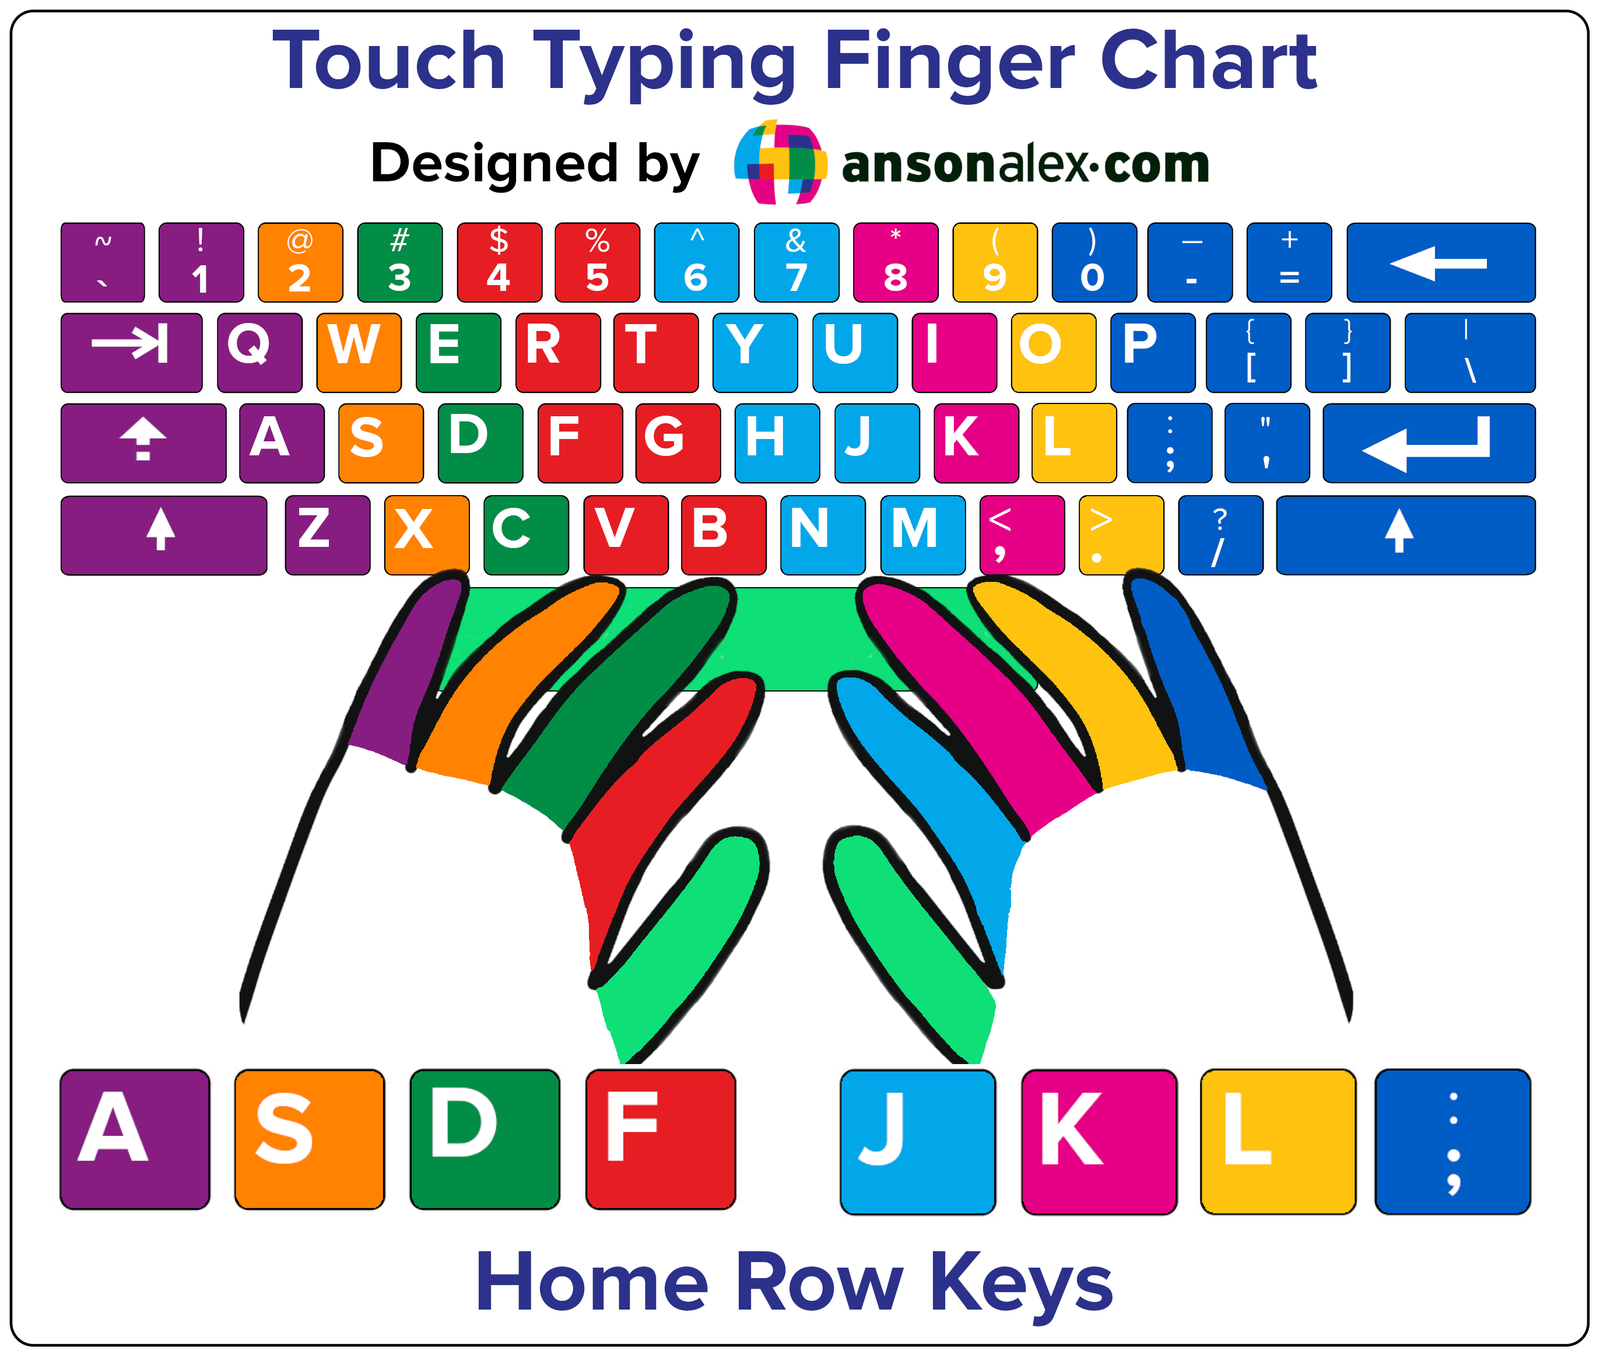
Where do your fingers go?
Touch typing is built around the home row. Your fingers return here after each keystroke (especially while learning):
A S D F (left hand)
J K L ; (right hand)
Quick tip: the F and J keys usually have a small bump. Use those bumps to “reset” without looking.
Don’t look at the keyboard. If you get lost, glance at the chart instead — that’s how the skill actually locks in.
What is a good typing speed?
Typing speed is measured in words per minute (WPM). Here’s a simple reference chart:
| Typing Speed (WPM) | Common Skill Level |
|---|---|
| 0–20 | Beginner |
| 20–40 | Casual typist |
| 40–60 | Average / office level |
| 60–80 | Above average |
| 80+ | Advanced / professional |
Important: speed only matters when accuracy stays high. If accuracy drops, slow down and clean it up first.
How long does it take to learn touch typing?
- First real improvement: usually within 1–2 weeks if you practice most days
- Comfortable and consistent: often 4–8 weeks
- Fast (and clean): a few months of consistent practice
The shortcut isn’t “more time.” It’s better reps. Ten accurate minutes beats an hour of sloppy typing.
Start the Learning Path
Learn → Practice → Progress. Each lesson has two parts:
- Lesson page: learn the technique (text + video)
- TypeDrift practice: drill the exact keys you just learned
Already past the home row? Use the hub to jump to the right stage (Index → Middle → Ring → Pinky/Shift).
Common mistakes that slow you down
- Chasing speed too early: speed without accuracy = bad muscle memory
- Looking at the keyboard: it resets your progress every time you glance down
- Long sessions: fatigue causes sloppy reps — keep it short and consistent
- Skipping stages: home row and correct reaches prevent weird “holes” later
If you want extra help, the hub also includes general tip videos like common mistakes and typing games (used correctly).
Frequently Asked Questions
Touch typing is typing without looking at the keyboard, using consistent finger placement and returning to the home row so your hands learn key locations through muscle memory.
Practice daily for 10–15 minutes, keep accuracy high, and follow a structured progression (home row → index → middle → ring → pinky/shift). Short, accurate sessions build speed faster than long sloppy sessions.
Around 40 WPM is average for many people. 60+ WPM is above average, and 80+ WPM is often considered advanced — but accuracy is the priority at every level.
Use the F and J bumps to reset your hands on the home row, and if you get stuck, glance at a finger chart instead of looking down. That trains the correct habit.
Yes, but only after your fundamentals are solid. Use games as a reward or accuracy check — not as your main practice — so you don’t train sloppy speed.
Ready to start?
If you want the clean step-by-step path, use the hub. If you want the fastest way to build skill, practice accuracy-first in TypeDrift.