Improve your typing skill with these lessons and tutorials on the standard keyboarding technique, known as “touch typing“.
Learn which keys your fingers are responsible for, how to overcome keyboarding hurdles and explore different strategies for practicing and staying motivated.
I have been typing since elementary school and have been sharing my typing experience online since 2012. As you’ll see below, I’ve even authored a full typing course for LinkedIn Learning.
Along the way, I’ve learned additional benefits to keyboarding, more tips and techniques to share and have been inspired by others who have also embraced being able to type at lightning speed.
The video above contains tips and strategies to improve your touch typing skill, practice more effectively and to stay motivated as you embark upon your typing journey.
The typing lessons below provide a more granular explanation of learning the standard touch typing technique, more detail about specific keystrokes and present additional typing practice opportunities.
Table of Contents
What is Touch Typing?
Touch typing is any typing technique where the typist is not looking at the keyboard.
The name “touch typing” comes from the fact that you’re using your sense of touch to find the keys instead of your sense of sight.
There are multiple variations and keyboard configurations for touch typing. The most popular method uses a “QWERTY” keyboard (named from the first 6 letters at the top-left) and focuses on the fingers always returning to a central position known as the “home row“.
If you’re just starting out, it makes most sense to learn this method. It is widely considered the most efficient way of typing. Most keyboards available use the QWERTY layout. Additionally, most typing instruction, lessons and tutorials focus on teaching this method.
In reality, typing properly is all about typing efficiently so that less time and effort is needed for each keystroke. At the end of the day, it doesn’t matter which finger you use for each key but, if you want to type as efficiently as possible, learning to touch type with the standard “home row” method is your best bet.
Once you learn how to type without looking, your speed will continue to improve as you practice more and more.
After you master typing from the home row, you may decide to modify your technique a bit – based on your specific workflow. At that point, personalizing your method makes total sense.
Why Learn Touch Typing?
People who learn how to touch type properly can type much faster.
After learning you will be able to get more done at work, quickly complete mundane tasks in your personal life and communicate with friends and colleagues more effectively.
Example of tasks expedited by touch typing include:
- Sending emails
- Completing school reports
- Finishing work documents
- Communication through chat
- Searching Google (imagine the time saved…)
- Online shopping
- Filling out forms
- General computer navigation
If you spend a lot of time online or working on a computer, over the course of a year, you can literally save days by being able to finish computer related tasks so quickly.
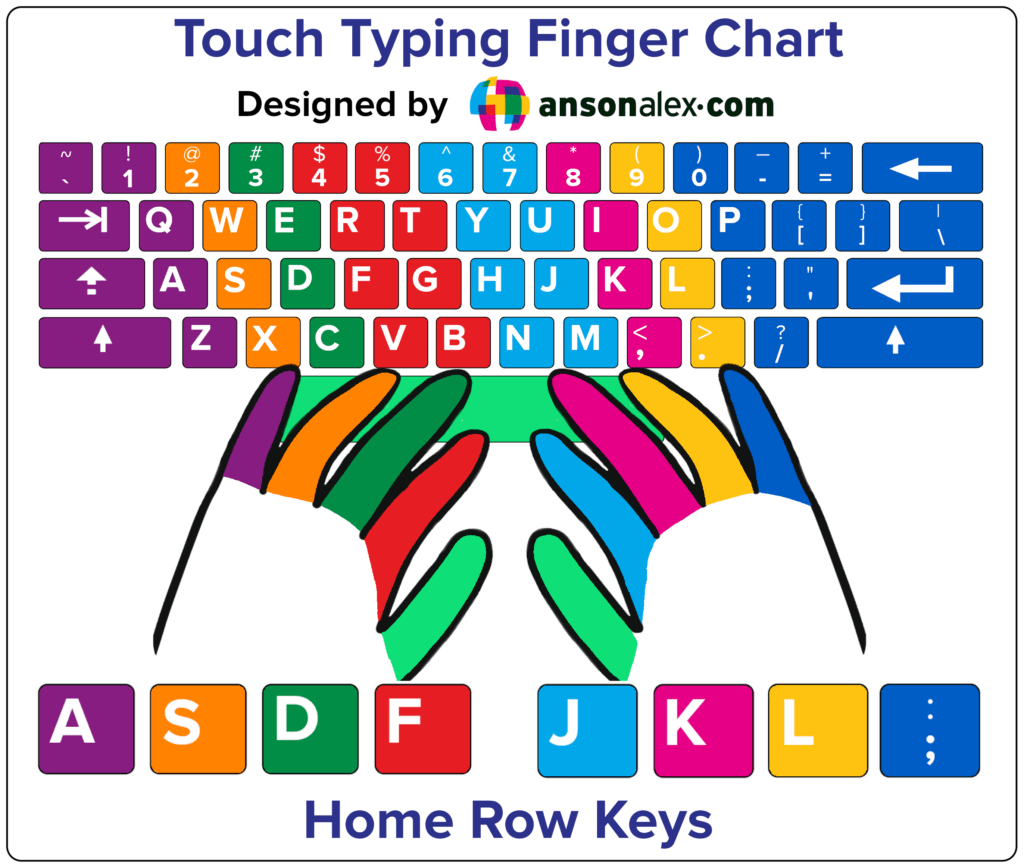
Touch Typing Keyboard Finger Chart
It is recommended to print out or save a keyboard finger chart to your computer to use when practicing touch typing.
As you move through the lessons and learn more keys, it’s important for progression to avoid looking at the keyboard whenever possible.
A keyboard finger chart can be used as reference when you’re having trouble finding a particular key. Using one allows you to avoid looking at keyboard while continuing to improve your typing skill.
Lesson 1: Touch Typing Essentials & Home Row
Touch typing with the standard technique is not something that will come overnight and it takes a lot of time and practice. In the long run however, it is most definitely worth it.
To get started, take a look at the finger chart above and pay special attention to the home row keys.
It may be a good idea to print the chart out and keep it next to your workstation for reference as you memorize which finger is used for each key.
When you’re starting out, using the proper finger to type each letter is extremely important even though it may seem tedious at times.
It’s important to remember that typing is both a mental and physical skill. To become more efficient, focus on the following areas:
- Looking away from the keyboard
- Memorization of keys
- Memorization of which finger is used for each key
- Fine motor skills (fingers)
- Brain and finger synchronization
- Reading skill
As you improve at typing, it will become easier and easier to type each letter on the keyboard with the correct finger. When this happens, your typing speed will naturally increase and you will be able to perform typing-related tasks faster and faster.
The Home Row
The first step in learning how to touch type is becoming comfortable with the home row.
The “home row” in touch typing consists of 8 keys in the middle of the keyboard that your 8 fingers (thumbs aren’t fingers) should always go back to after typing a letter.
The following keys make up the home row:
A S D F (left-hand) J K L ; (right-hand)
Remember, you can refer to the chart above to see which finger is associated with each key.
Let’s be honest, once you create some muscle memory with your fingers, you may naturally cheat a little bit.
For example, if you are typing the word “nut”, you may end up going directly from the letter N to the letter U with your right index finger – instead of first returning to the J key.
As you first learn to type, however, doing this can have a negative impact on your progress.
It may take some time for your fingers to adjust to bending in the correct way to accurately type each letter on the keyboard.
If you start cheating right from the beginning, there may be some pesky keys on the keyboard that you will struggle with for much longer than if you hadn’t cut corners early on.
Touch Typing: First Practice
Now that you’re familiar with the home row, you’re ready for your first typing practice.
Simply open up a blank document and start typing the letters in the home row.
You may find that your index and middle fingers work quite well but that your ring and pinky fingers are more stiff and tire more quickly.
This is completely normal and will take time to overcome.
To start improving the connection between your fingers and your brain, you can also start adding some spaces in between the home row letters while you practice.
Touch Typing: Lesson 1 Practice Sheet (Home Row)
Once you feel comfortable with the home row letters, you can slowly start adding more letters one at a time. It is recommended to start out with letters typed by your index fingers, then move on to the middle and ring fingers and, finally, start to practice keys typed by those pesky pinky fingers.
Lesson 2: Index Fingers and Shift Keys
Once you feel comfortable typing the letters in the home row, it’s time to branch out. Since your index fingers should already be more nimble than your other fingers, learning their primary keys should be your next goal. We will also begin using our pinkies in this section to make two very important touch typing keystrokes.
Index Finger Touch Typing
When touch typing, the index fingers are responsible for the following keys:
4 5 R T F G V B (left index finger) 6 7 Y U H J N M (right index finger)
Remember to refer to the finger chart if you have trouble remembering, instead of looking at your keyboard.
Keep in mind that it is important to return each finger to the home row after every keystroke. This helps build muscle memory and will help you master touch typing more quickly.
Begin practicing the above index finger keys in a blank document like you did when practicing the home row keys.
Typing the Shift Keys
While you work on your index fingers, it’s also a good idea to begin learning the shift keys. They are used in every single full sentence and provide valuable practice to your pinkie fingers. Learning these keystrokes is also a big step in getting your whole hands involved in touch typing.
As I’m sure you have realized at this point, your left pinkie is responsible for the left shift key and your right pinkie is responsible for the right shift key.
For example, you should use the left shift when capitalizing the letter U and the right shift when capitalizing the letter T.
This ensures that neither of your two hands is overworked when capitalizing letters.
I’ll be honest and expose one of my habits here. I use my left pinkie for all of my shifts and am still able to press all of the keys on the left side of the keyboard with my left hand while also pressing shift with my left hand. I think this is due to the fact that my right hand is often on the mouse and the left hand is more ready to press any key.
I’m not saying that you should do this but I do want to show that even advanced typists are human and develop habits and deviations from the standard method.
If you’re just learning from a blank slate however, you should work to minimize these deviations as much as possible and develop a fundamental touch tying method.
When typing the shift keys, you may find that you must move your entire hand to make the keystroke. This is normal and will improve over time as your hands become more nimble.
Do you best to still make the keystroke without looking and return to the home row afterward. Remember that the F and J keys should have a bump / ridge on them so you know when you’re in the right place.
Touch Typing: Lesson 2 Practice Sheet (Index Fingers)
Lesson 3: Middle Finger Keys
Once you’re comfortable typing the keys in the home row and all of the primary keys typed by the index fingers, it’s time to move on to the middle fingers.
The middle fingers are generally quite dexterous and should behave similarly to your index fingers.
Luckily there are only 8 keys the middle fingers are responsible for when typing:
3 E D C (left middle finger) 8 I K , (right middle finger)
It’s best to begin submitting these keystrokes to muscle memory in the same way that we did with the index fingers.
Start by opening up a black document and typing the new keystrokes repetitively. Once you’re comfortable with them, you can add-in keystrokes learned previously and begin to type words and sentences.
Remember there is a practice document at the end of this lesson that you can use to practice the new keys.
Touch Typing: Lesson 3 Practice Sheet (Middle Fingers)
Lesson 4: Ring and Pinky Fingers
Touch Typing: Lesson 4.1 Practice Sheet (Ring Fingers)
Touch Typing: Lesson 4.2 Practice Sheet (Pinky Fingers)
Touch Typing: Staying Accountable
If you’re going to train yourself to type correctly, you must hold yourself accountable and practice as much as you can – even if you end up typing slower than usual when you first begin.
You have probably learned a relatively efficient way of typing over time – even if you’re not utilizing each finger to its fullest extent. Because of this, it may seem like proper typing is a waste of time.
Trust me, it pays off in the long run.
Referring back to the benefits of typing that were discussed earlier can serve as a helpful reminder to the advantages that touch typing provides and may aid in motivating you to continue practicing.
A good way to break up your typing practice is to play some typing games from time to time.
My favorite free typing game to play is Nitro Type. It’s a racing game that allows for plenty of achievements and a multiplayer experience.
A quick Google search will also bring up plenty of additional options if racing isn’t your thing.
Measuring typing progress
The best way to measure your proficiency at typing is to measure your “true typing speed“.
True typing speed measures how fast you can type while also considering accuracy when calculating the final score.
If you’re wondering how true typing speed is calculated, I give a quick explanation in the video below.
You can measure your typing speed with an online test and then retake the test once you think your score has improved.
Also, most online typing games track your accuracy and speed while you play. You can record this data and then come back and play the same game in the future to check on your progress.
Once you really start to makes some big strides, your progress should be noticeable in your everyday computer tasks. Once you’ve gained some finger dexterity, you should be able to type documents and send emails faster.
Additional Typing Instruction
“Learning Typing” Course on LinkedIn Learning
For a full-fledged course on touch typing with the standard method, I recommend you check out my typing course on LinkedIn Learning.
The course is geared towards beginner typists but provides value to typists of any ability level.
The typing lessons within provide detailed instructions and tips for tackling each key on the keyboard. I discuss strategies to practice effectively and share plenty of tips for you to become as efficient of a typist as possible.
It also includes a built in practice module that you can use as you progress in the course. The practice module measures both your speed and accuracy for each section of the course, as well as measuring your cumulative results.
Original Typing Lessons on YouTube
If you’re looking to practice and commit the fundamentals of touch typing to memory, it can’t hurt to take a look at my original videos that began my journey in helping others to learn the skill of typing.
I believe the more recent typing tutorials on this page are more polished but many still find these tutorials helpful and inspiring.