Short answer: Downgrading macOS requires erasing your Mac and reinstalling an older version using a bootable installer (for supported macOS versions) or OpenCore Legacy Patcher (for unsupported Macs). Apple does not support in-place downgrades, and Time Machine backups cannot be restored to an older macOS version.
This guide shows you exactly how to downgrade macOS safely — whether you’re reverting to the last officially supported version for your Mac or downgrading from an unsupported version like Tahoe or Sequoia.
If a newer version of macOS is running poorly, breaking app compatibility, or introducing bugs, downgrading is often the cleanest solution. The process looks intimidating at first, but if you follow the steps in order, it’s very manageable.
Before you downgrade macOS (read this first)
- Downgrading requires erasing your internal drive.
- You cannot restore a Time Machine backup to an older macOS version.
- Manually back up important files to an external drive or cloud storage.
Once your data is safely backed up, the downgrade process itself is straightforward.
Which downgrade method should you use?
| Your situation | Recommended method | Why |
|---|---|---|
| Downgrading to last officially supported macOS | Bootable USB installer | Most reliable and Apple-supported approach |
| Downgrading from Tahoe / Sequoia on an unsupported Mac | OpenCore Legacy Patcher | Allows unsupported installs and older versions |
| Mac won’t boot or is unstable | USB installer + Recovery | Works even when macOS is broken |
Step 1: Identify your exact Mac model
Click the Apple menu () in the top-left corner of your screen, then select About This Mac. This opens a window showing your Mac’s overview and serial number.
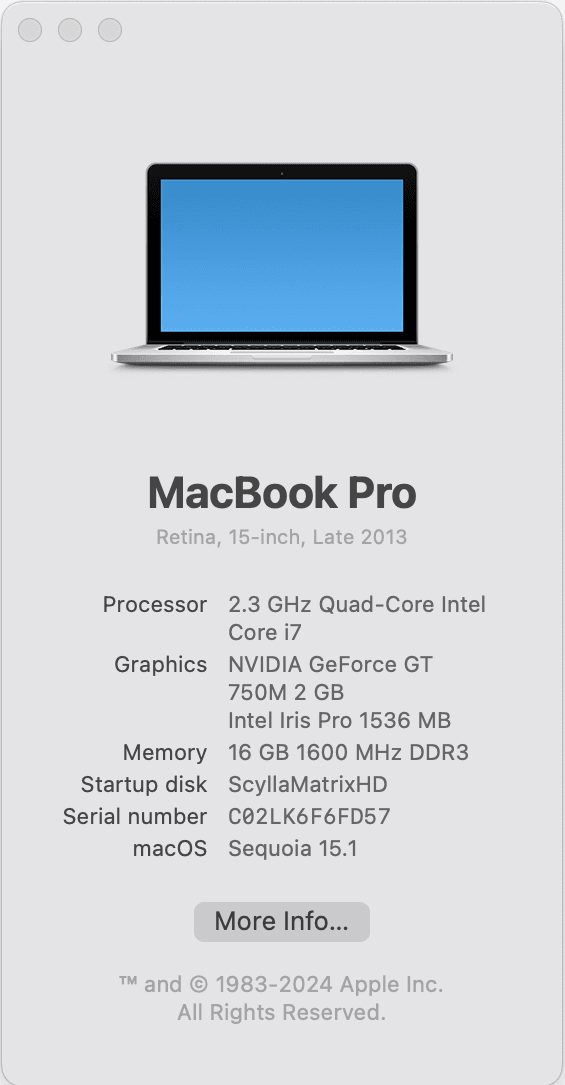
Next, look up your exact model identifier (for example, MacBookPro11,3). The easiest way is EveryMac’s Ultimate Mac Lookup tool:
Knowing your exact model lets you determine the last officially supported macOS version, which is usually the safest downgrade target.
Step 2: Download the macOS installer from Apple
Apple distributes macOS installers through the App Store and Software Update. The most reliable way to find the correct download is Apple’s official macOS download page:
https://support.apple.com/en-us/102662Apple Support: Download and install macOS
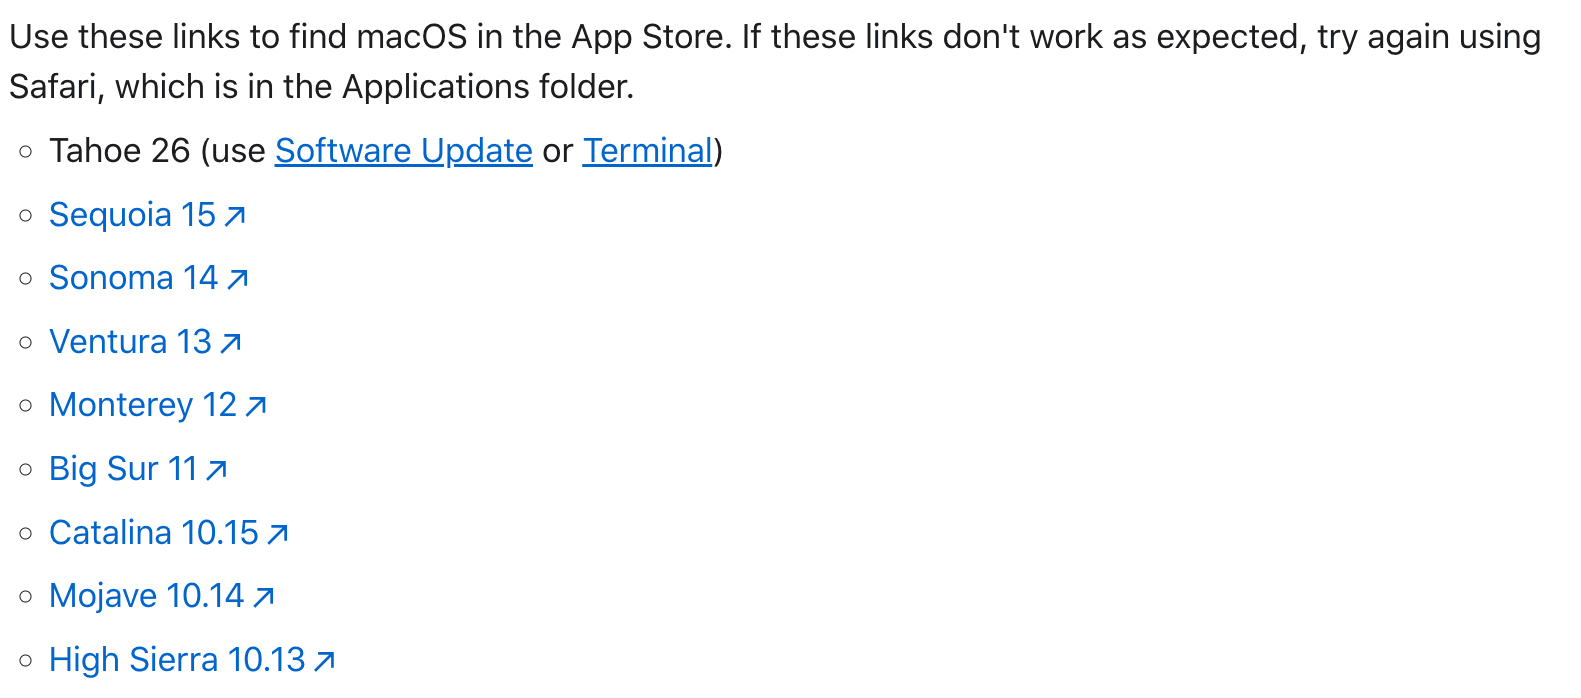
Click the macOS version you want. It will open the App Store (or Software Update) where you can click Get.
Important: After clicking Get, it may look like nothing is happening for up to a minute. This delay is normal.
When the download finishes, check your Applications folder for Install macOS (Version Name).
Step 3: Create a bootable macOS installer
The most reliable downgrade method is a bootable USB installer. You’ll need a 32GB or larger USB drive that can be erased.
Apple provides official Terminal commands using createinstallmedia:
Apple Support: Create a bootable installer for macOS
If you’re downgrading to an unsupported version of macOS, use OpenCore Legacy Patcher instead. This Sequoia guide applies across versions:
Install macOS Sequoia on Unsupported Macs (OpenCore Guide)
Step 4: Boot from the installer and reinstall macOS
- Restart your Mac and immediately hold the Option key.
- Select the bootable macOS installer.
- Choose Disk Utility.
- Select the main internal drive and click Erase.
- Set the format to APFS.
- Quit Disk Utility and choose Install macOS.

Common macOS downgrade mistakes to avoid
- Trying to downgrade without erasing the internal drive
- Assuming Time Machine backups will restore to older macOS versions
- Installing the wrong macOS version for your exact Mac model
- Skipping backups because the process “seems quick”
Frequently Asked Questions
No. Apple does not support in-place downgrades. A full erase and reinstall is required.
Yes. The downgrade workflow remains the same across macOS releases.
Last updated: January 2026