Last updated January 2026
macOS 15 Sequoia has been out for quite some time now, and as of late 2025 this guide remains the most reliable, clean, and thoroughly tested way to install Sequoia on unsupported Intel Macs. The video above was recorded in late 2024, but I’ve continued testing this process on multiple machines and verifying compatibility with current Sequoia builds and modern OpenCore Legacy Patcher workflows.
If you previously followed my unsupported macOS Sonoma upgrade guide, this workflow will feel very familiar, with refinements and stability improvements for Sequoia.
This guide walks you through the cleanest and most reliable method for installing macOS Sequoia on unsupported Macs using OpenCore Legacy Patcher (OCLP). For deeper technical documentation (supported models, patching behavior, and update best practices), see the official Dortania OpenCore Legacy Patcher documentation.
Need to revert later? If Sequoia doesn’t run the way you hoped (performance, app compatibility, bugs), you can safely roll back by erasing and reinstalling an older version. Here’s my full guide: How to Downgrade macOS to an Older Version (Step-by-Step).
TL;DR (Quick Version)
- Back up first (Time Machine or full disk backup).
- Download the latest OCLP from GitHub (don’t reuse an old copy).
- Update your current macOS to the latest available version.
- Use OCLP to download Sequoia and create a 32GB+ USB installer.
- Install OpenCore to the USB (critical).
- Boot holding Option (⌥) → choose EFI Boot → install Sequoia.
- After install: install OpenCore to internal disk → run Post-Install Root Patch → reboot.
- After any future Sequoia update: run Root Patch again.
If you want the safe, clean, repeatable method (and want to avoid the most common mistakes), keep reading.
Important Note About macOS Tahoe
A lot of people landing here are actually looking for ways to install macOS Tahoe on unsupported Macs. As of early 2026, Tahoe is not officially supported by OpenCore Legacy Patcher, and attempts to force it on unsupported hardware are widely reported as unstable or risky. For now, macOS Sequoia remains the last modern macOS release that most unsupported Intel Macs can run reliably with OCLP. If/when Tahoe becomes realistically viable, it deserves its own dedicated guide and a separate “do this / don’t do this” breakdown.
If you’re curious why Apple drops support for older Macs so aggressively, I explain the bigger picture in my video: Why Apple Doesn’t Support Your Mac.
Before You Begin
OpenCore Legacy Patcher supports a wide range of older Macs, but there are model-specific exceptions. Before doing anything else, review the latest OCLP release notes and confirm your exact Mac model is supported (Dortania also maintains a supported-models reference).
What You Need
- A compatible Intel Mac (confirmed supported by OCLP)
- A 32GB (or larger) USB flash drive (will be erased)
- A full backup (Time Machine or full disk backup strongly recommended)
- Power connected if you’re on a laptop (do not do this on battery)
- Enough free storage for the Sequoia installer download
Important: Your USB drive will be erased during this process.
Strongly Recommended (Avoids Headaches)
- Unplug other external drives while building the installer (reduces “wrong disk” mistakes).
- Disable automatic major upgrades so your Mac doesn’t try to jump to something newer (especially relevant with the Tahoe situation).
- Plan for 30–60 minutes total depending on your Mac, USB speed, and internal drive speed.
Step 1 — Download the Latest OpenCore Legacy Patcher
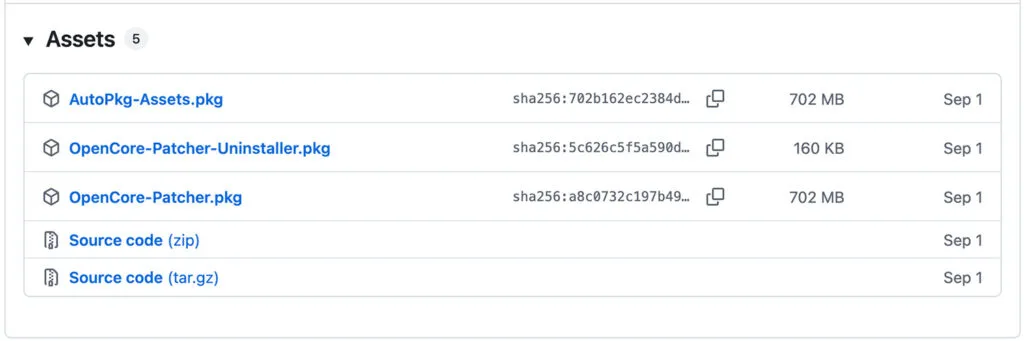
- Go to the official OCLP GitHub releases page and download the latest
OpenCorePatcherGUI.app.zip. - Extract the ZIP and open the app.
- If macOS blocks it, allow it in System Settings → Privacy & Security.
Do not continue until your Mac model is confirmed supported in the release notes for the version you downloaded.
Step 2 — Update Your Current macOS First
Updating your existing macOS installation before upgrading to Sequoia improves reliability and reduces the risk of installer failures (especially on already-unsupported installs).
- Apple menu → System Settings
- General → Software Update
- Install all available updates
If you need help managing disks or confirming what you’re erasing (clean install path), see my Disk Utility for macOS tutorial.
Step 3 — Download the macOS Sequoia Installer in OCLP
- Open OpenCore Legacy Patcher
- Click Create macOS Installer
- Click Download macOS Installer
- Select macOS 15 Sequoia and download
Wait for the download, then allow OCLP to validate/extract the installer. If you’re tight on storage, free up space before continuing.
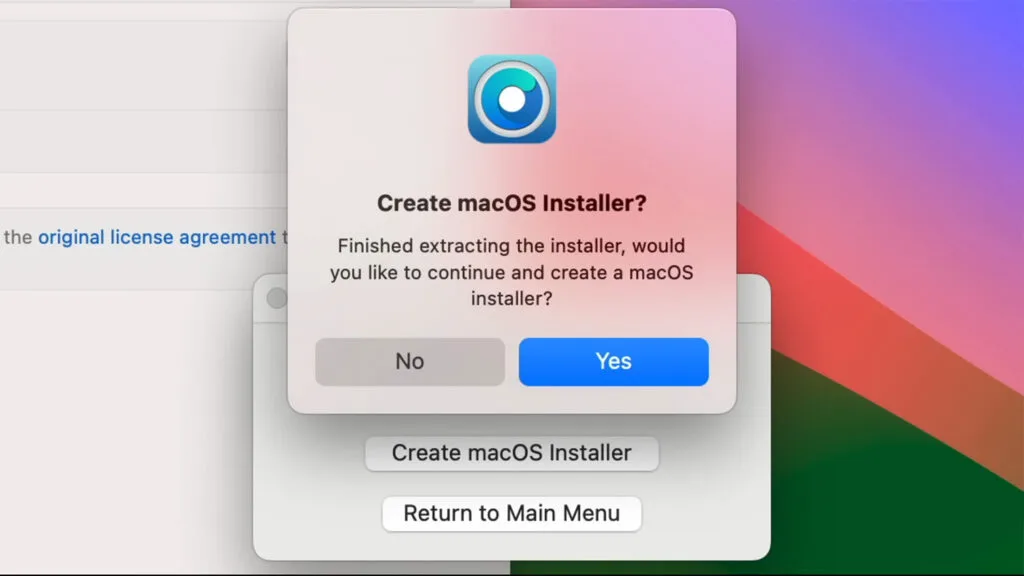
Step 4 — Create the Sequoia USB Installer (32GB+)
- Insert your 32GB+ USB flash drive.
- When prompted, confirm you want to create the installer.
- Select the Sequoia installer you just downloaded.
- Select your USB drive from the list.
- Confirm the erase and let OCLP build the installer.
Tip: Ideally the USB is the only external drive attached at this point, so there’s no confusion when selecting the target.
Step 5 — Install OpenCore to the USB (Critical)
After the USB installer is created, you must install OpenCore onto the USB drive. This is what makes the USB bootable on an unsupported Mac and allows Sequoia to install properly.
- In OCLP, choose Install OpenCore to Disk (or the install-to-disk option you’re prompted with).
- Select your USB drive (not your internal drive).
- Confirm and let OpenCore install to the USB.
Common mistake: selecting the internal drive here instead of the USB. If you’re not 100% sure, stop and verify before clicking install.
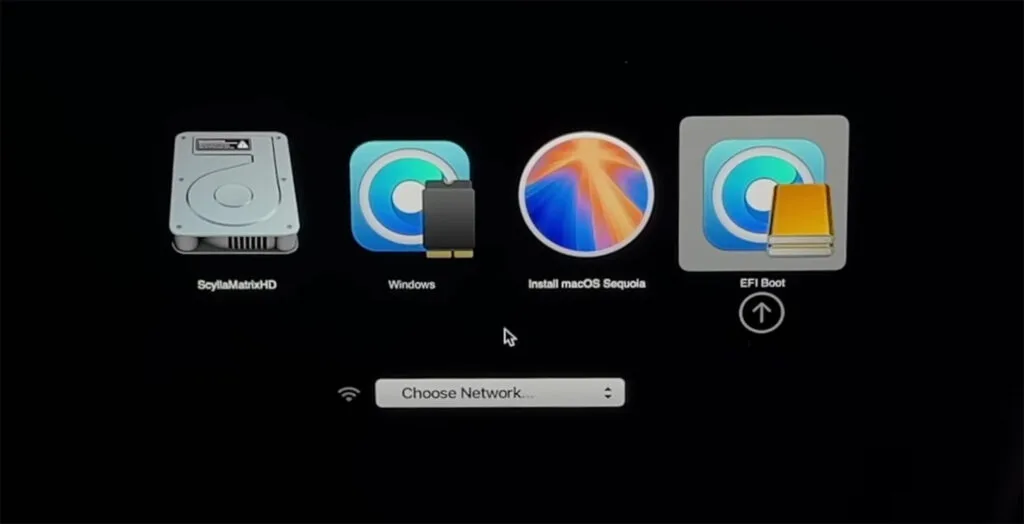
Step 6 — Boot the Installer (EFI Boot)
- Reboot your Mac.
- Immediately hold the Option (⌥) key until the boot picker appears.
- Select EFI Boot (this is OpenCore on the USB) and continue.
- On the OpenCore menu, select Install macOS Sequoia.
Step 7 — Install macOS Sequoia
Once the macOS installer loads, you have two paths:
- Clean install (recommended): Open Disk Utility, erase your internal drive, then install Sequoia fresh. This is the best option for long-term stability and performance.
- Install over your current system: Install Sequoia while keeping your files. This is faster and easier, but a clean install typically produces the cleanest results.
Follow the prompts: continue, agree to the license, select your internal drive, and start the installation. During the install your Mac will reboot multiple times and you may briefly see the boot picker flash. In most cases you do not need to press anything — just let it run. The full process can take 30–60 minutes depending on your Mac and storage speed.
Important: Keep laptops plugged into power throughout the installation. Unexpected shutdowns mid-install can corrupt the install.
Step 8 — Install OpenCore to Your Internal Drive
After Sequoia finishes installing and you reach the login screen, log in and allow the system a minute to finish background setup. OCLP will often display a message that you’re still booting from USB and should install OpenCore to disk. Do that now so you can boot without the USB.
- Open OpenCore Legacy Patcher.
- Click Install OpenCore to Disk.
- Select your internal drive (the one Sequoia was installed on).
- Select the EFI volume when prompted.
- Reboot when finished.
Common mistake: selecting the USB again here. At this stage, you want OpenCore installed to the internal disk so the system boots normally.
Step 9 — Run Post-Install Root Patching (Usually Required)
Root patching is where OCLP applies the hardware-enablement patches needed for many older Macs (graphics acceleration, Wi-Fi, etc.). Even if things appear to work, running root patches is a common “make it fully correct” step after the first boot.
- Open OpenCore Legacy Patcher.
- Click Post Install Root Patch.
- Click Start Root Patching and enter your password if prompted.
- When it finishes, eject your USB drive.
- Reboot to apply changes.
Confirm It Worked
Go to Apple menu → About This Mac and confirm that macOS 15 Sequoia is installed.
Common Mistakes (Read This Before You Start)
- Using an older OCLP build: always download the latest release fresh (especially for major OS installs).
- Not checking your exact model: OCLP supports many Macs, but not all combinations and not all edge cases.
- Selecting the wrong disk: USB when building the installer + installing OpenCore to USB; internal disk after Sequoia installs.
- Skipping root patches: lots of “Wi-Fi missing / graphics weird” problems are just “root patch wasn’t applied.”
- Doing this on low battery: always plug in a laptop.
- Letting the Mac auto-upgrade later: avoid surprise major upgrades (especially relevant given Tahoe’s lack of OCLP support).
Common Problems & Fixes
- Boot loop: boot back into OCLP and re-run Post Install Root Patch.
- Black screen on login: try Safe Mode, then re-run root patching.
- Wi-Fi missing: re-run root patching (most common fix).
- After macOS update issues: re-run root patching after updates.
- Installer freezing or failing: ensure plenty of free space, use a quality USB drive, and keep the Mac plugged in.
Future Sequoia Updates (2026+)
Install Sequoia updates normally via System Settings → Software Update. OCLP’s own documentation still recommends staying current on OCLP when updating macOS, and re-applying patches as needed. After every Sequoia update, open OpenCore Legacy Patcher and run Post Install Root Patch again to maintain full hardware support.
Good luck upgrading those unsupported Macs.