Knowing how to take a screenshot on macOS is a useful skill for any type of Mac user.
There is no difference between taking a screenshot on a MacBook Pro, Air or iMac so, once you’ve mastered the art of screenshots, you’ll be a skilled at computer screen photography on any Mac.
If you’re new to taking screenshots on Mac, you may be surprised with how many options you have and how creative you can be when capturing images of your computer screen. There is an intangible feeling when taking screenshots on a Mac that invokes both simplicity and beauty.
As someone who uses both Windows and Mac:
Being able to quickly take pre-cropped and customized screenshots, without any additional software, makes content creation on Mac a dream.
There are a number of different methods and shortcut keys for taking screenshots on macOS. Deciding which method to use depends on what part of your screen you’d like to capture and what you’d like to do with the screenshot afterwards.
By learning all of the ways to screenshot on macOS, you’ll be able to handle any situation that arises by using the best possible method.
So, the question remains:
How do you take a screenshot on Mac?
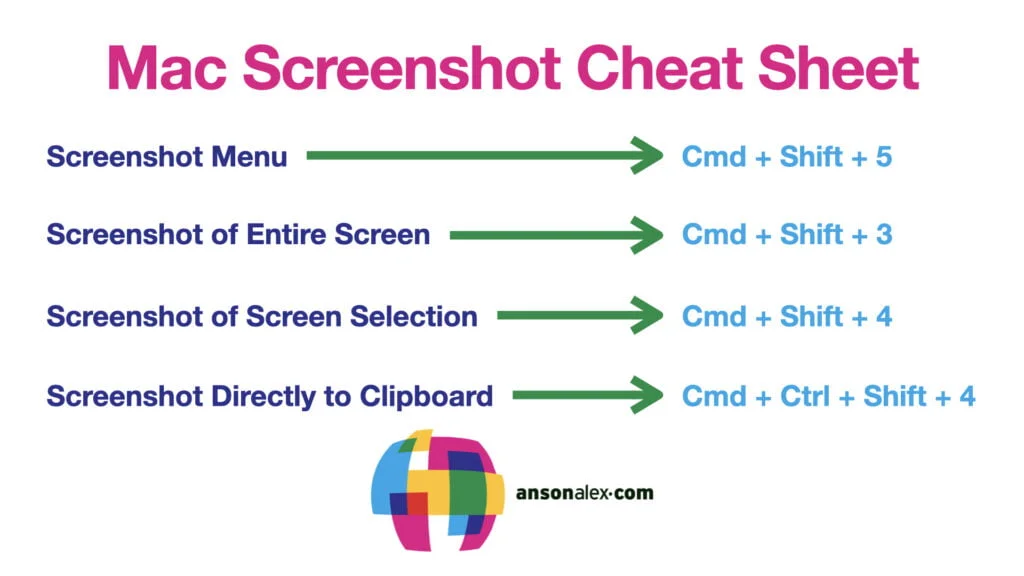
Screenshot of Entire Screen on macOS
Command + Shift + 3
This keyboard shortcut takes a screenshot of your entire screen. It’s useful when you quickly need to capture something or need to make sure that you don’t miss anything on the screen.
You can always crop out part of the screenshot afterward. When you use this keyboard shortcut to take a screenshot, the captured image (or images if you have multiple displays) will automatically be added to your desktop as a .png file with a timestamp as part of its file name.

Screenshot of Screen Selection on macOS
Command + Shift + 4
Using this keyboard shortcut will turn your computer mouse into crosshairs to click and drag over a selected area to capture a screenshot of only that area. Taking a screenshot with screen selection is how you can crop a screenshot on Mac automatically, without having to use Preview or another image editor.
This method is useful when you only want to capture a certain part of your screen and don’t want to deal with cropping the image later on.

Screenshot to Clipboard on macOS
Command + Control + Shift + 4
If you want to save time when pasting screenshots in macOS, you can use this command to copy a screenshot directly to your macOS clipboard. Your mouse will turn into crosshairs, like taking a screen selection screenshot, allowing you to select the portion of your screen that you’d like to capture.
The screenshot won’t appear on the desktop and the only way to access it is to paste it somewhere using command + v or pasting from the edit menu. After taking the screenshot, you will be able to paste it into any area that takes images such as documents, emails, image editors, etc.
macOS Screenshot Menu
Command + Shift + 5
This shortcut brings up the screenshot menu for macOS which includes additional screenshot and screen recording options:
- Capture selected window
- Record entire screen (video)
- Record selected portion (video)

When it comes to actual screenshots, and not screen recordings, capture selected window is the only actual screenshot option available in the Screenshot Menu that can’t also be done with keyboard shortcuts.
Notice that video screen recordings can be captured using the Screenshot Menu. Be aware that native screen recording software on macOS is very limited and, if you’re planning on doing any in-depth screen recording at all, you should use a third party application. This is especially true if you plan to use audio as a component in your screen recordings.
Screenshot App in Spotlight
If you search “screenshot” in Spotlight you will find an application called “Screenshot” that will bring up the screenshot menu when opened. It essentially takes you to the same place that pressing Command + Shift + 5 would bring you to.

Mac Screenshot Cheat Sheet
Remembering all of the keyboard shortcuts to take screenshots on Mac can take some time and practice. To help get things started, I’ve created a cheat sheet containing all of the keyboard shortcuts used to take screenshots on macOS.
You can right click and save the image if you’d like but, I bet you can save it quicker by taking a screenshot.