Short answer: You can install Windows 11 on many Intel-based Macs using Boot Camp Assistant by creating a Windows 11 USB installer from Microsoft’s official ISO, then applying a quick setup workaround for Windows 11’s security checks during installation. After Windows installs, Boot Camp finishes driver setup so everything runs normally.
Last updated: January 2026
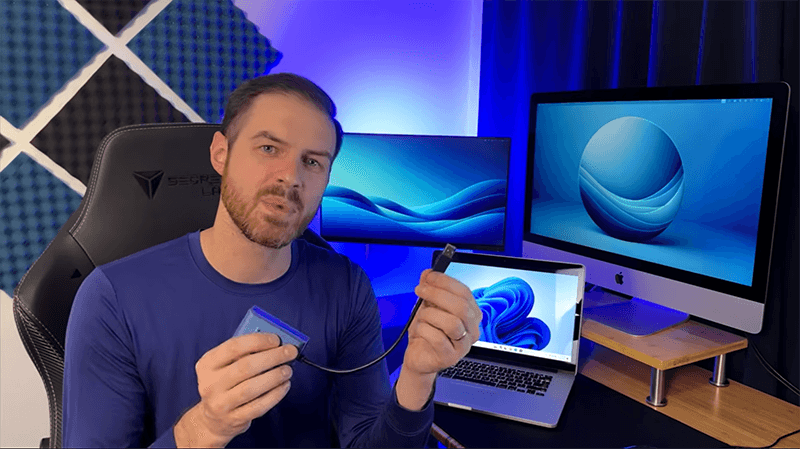
This tutorial shows you exactly how I installed a full Windows 11 Boot Camp setup on a 2013 MacBook Pro in under an hour — and how you can do the same on an Intel Mac that supports Boot Camp. The key is using the official Windows 11 ISO and letting Boot Camp Assistant create the installer, partition your drive, and install drivers.
Important: Windows 11 has hardware/security requirements that many older Intel Macs don’t meet by default (TPM / Secure Boot). The workaround in this guide helps Windows Setup continue, but this is not the same as a fully “requirements-compliant” Windows 11 PC. It’s still extremely usable — just understand what you’re doing before you start.
What you’ll need (before you start)
- An Intel-based Mac that supports Boot Camp Assistant (Apple silicon Macs are different — Boot Camp isn’t the same process there).
- A 16GB or larger USB drive (it will be erased).
- Enough free space to partition for Windows (I used ~150GB).
- A stable internet connection (you’ll likely need it during setup — see the Wi-Fi section below).
- Optional but strongly recommended: a USB-to-Ethernet adapter or Ethernet access for the setup screen where Wi-Fi may not work yet.
Helpful official references:
- Apple: Boot Camp Assistant User Guide
- Microsoft: Download Windows 11 (ISO)
- Microsoft: Windows 11 specifications & requirements
Step 1: Download the official Windows 11 ISO (x64)
First, download the official Windows 11 disk image (ISO) directly from Microsoft. On the download page, look for the option for the Windows 11 disk image (ISO), choose x64, and download.
Microsoft: Download Windows 11 (ISO)
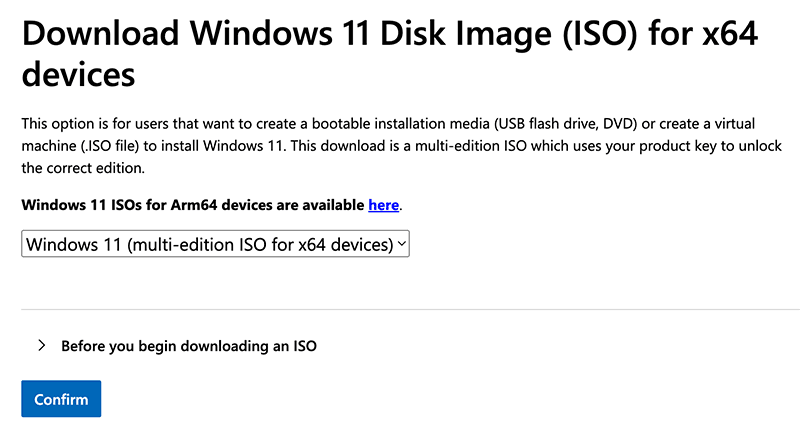
Tip: Keep the ISO somewhere easy to find (like Downloads). You’ll select it inside Boot Camp Assistant in the next step.
Step 2: Create the Windows installer USB using Boot Camp Assistant
Now you’ll use Boot Camp Assistant to (1) format your USB drive, (2) copy the Windows installer files, and (3) download/support the drivers you need for your Mac hardware.
- Insert your 16GB or larger USB drive (Boot Camp will erase it).
- Open Spotlight Search (press Command (⌘) + Space).
- Search for Boot Camp Assistant and open it.
- In Boot Camp Assistant, leave the default options checked (creating the installer + installing Windows), then click Continue.
- Select the Windows 11 ISO you downloaded.
- Select your USB drive as the destination.
- Click Continue and enter your Mac password when prompted.
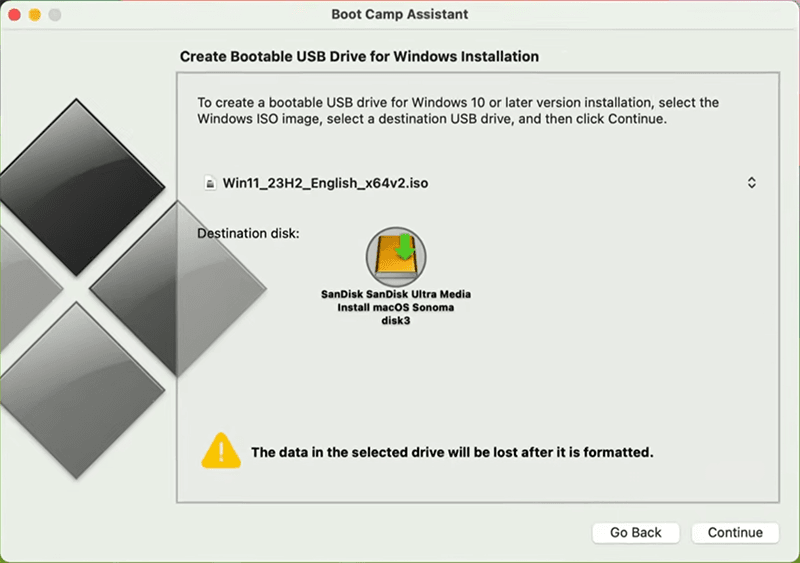
Boot Camp will create the installer (it took about 12 minutes in my test). When it finishes, you’ll see a slider to choose how much space to allocate to Windows.
My recommendation: If you plan to actually use Windows for apps/games/work, 100–200GB is a realistic target. I used ~150GB.
Once you choose a size, click Install. Boot Camp will partition your internal drive and your Mac will reboot automatically.
Step 3: Boot into the Windows 11 installer (if it doesn’t start automatically)
In many cases, your Mac will reboot straight into the Windows installer automatically. If it doesn’t, do this:
- Restart the Mac.
- Immediately hold the Option (⌥) key.
- Select the Windows installer from the boot menu.
You’ll see the Windows logo and it may take a couple minutes to load.
Step 4: Apply the Windows 11 setup workaround (TPM / Secure Boot checks)
This is the “make it work on many Intel Macs” step. Windows 11 requires certain security features (like TPM 2.0 and Secure Boot) that many older Boot Camp installs won’t satisfy by default. During Windows Setup, you can add registry values so the installer continues.
Security note: This workaround does not make your Mac “less secure than Windows 10,” but it may be less secure than a fully compliant Windows 11 PC. Use good security practices: keep Windows updated, avoid sketchy downloads, and be cautious on untrusted networks.
Do this at the Windows Setup screen
- At the Windows setup screen, press Shift + F10 to open Command Prompt.
- Type
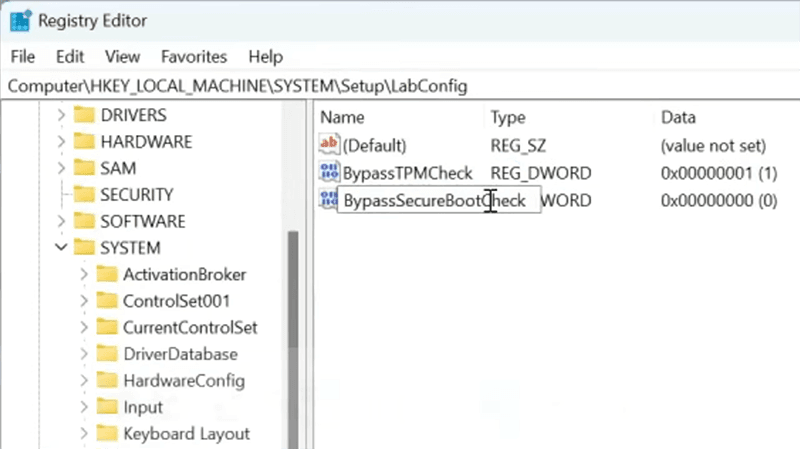
regeditand press Enter. - In Registry Editor, navigate to:
HKEY_LOCAL_MACHINE\SYSTEM\Setup - Right-click Setup → choose New → Key → name it
LabConfig - Select
LabConfig, then create these two values (each as DWORD (32-bit) Value):
BypassTPMCheck→ set value to 1
BypassSecureBootCheck→ set value to 1 - Close Registry Editor and Command Prompt.
Step 5: Install Windows 11 to the BOOTCAMP partition
- Continue Windows Setup and click Next.
- Enter a product key, or choose I don’t have a product key (you can activate later).
- Select the edition you want (Home/Pro).
- Accept the license terms.
- When asked where to install, select the BOOTCAMP partition and click Next.
Windows will copy files and reboot several times. Some restarts can take longer than you expect on older Macs — be patient.
Step 6: Fix the “no Wi-Fi” problem during Windows 11 setup
This is the most common point where people think the install “failed.” During setup, Windows 11 may require internet, but your Mac’s Wi-Fi drivers usually aren’t installed yet — so Wi-Fi won’t work until Boot Camp finishes driver installation.
Best fix: Use Ethernet temporarily.
- If your Mac has Ethernet: plug it in.
- If it doesn’t: use a USB-to-Ethernet adapter (these are inexpensive and work well for this exact situation).
Once you have internet, finish the setup steps (region, device name, Microsoft account/sign-in options, privacy settings, etc.). After that, Windows loads normally.
Step 7: Let Boot Camp finish driver installation (then update Windows)
After Windows 11 reaches the desktop, Boot Camp will finish installing Apple hardware drivers (this took about 5 minutes in my case). Then you’ll restart again, and you’re fully set.
- Open Windows Settings → Windows Update.
- Install all updates (including optional driver updates if offered).
- Restart as needed until Windows Update shows you’re current.
How to switch between macOS and Windows
To choose which operating system to boot:
- Restart your Mac and hold Option (⌥), then pick macOS or Windows.
Related (highly relevant): If you installed an unsupported macOS version and need to revert, use my downgrade guide here: How to Downgrade macOS (Supported + Unsupported Macs).
Common Windows 11 on Mac mistakes (read this before you start)
- Using the wrong ISO: download Windows 11 directly from Microsoft (x64).
- Picking the wrong drive/partition: install Windows to the BOOTCAMP partition — not your macOS partition.
- Forgetting the registry step: without the LabConfig values, Windows 11 Setup may refuse to install.
- Getting stuck on “connect to a network”: Wi-Fi drivers usually aren’t installed yet — use Ethernet temporarily.
- Not running Windows Update after install: updates can fix stability, driver behavior, and security issues.
FAQ
No — Apple silicon Macs (M-series) don’t use Boot Camp the same way Intel Macs do. This guide is specifically for Intel-based Macs.
Boot Camp itself is an Apple tool for Intel Macs, but Windows 11 has requirements that many older Macs won’t meet by default. This guide shows a practical install method that works in real-world testing, but it may not be considered a “fully supported” Windows 11 configuration by Microsoft.
It can run surprisingly well — especially on Macs with SSDs and enough RAM — but performance depends heavily on your exact model and hardware. After installing, always run Windows Update and keep drivers current.
Want more Mac upgrade help? If you’re trying to run newer macOS versions on older Intel Macs, start here: Install macOS Sequoia on Unsupported Macs (OpenCore Guide).