New to Mac? This macOS beginner guide walks you through the macOS basics in plain English (and from a Windows perspective when it helps). The video above is very thorough. This article is the updated written companion for the latest versions of macOS.
If you want more help beyond this macOS beginner guide, start here: AnsonAlex.com and my tutorial library (tons of Mac, iPhone, and productivity walkthroughs).
Quick reality check: If you’re coming from Windows, macOS won’t feel “hard”… it just uses different words and a few different habits. Once you learn the Dock, Finder, Spotlight, and System Settings, everything clicks (this macOS beginner guide is built around those four).
1) macOS Step 1: Check Your macOS Version
macOS changes slowly, but menus and settings locations can move around depending on your version. Before you follow any macOS beginner guide, check what you’re running:
- Click the Apple menu (top-left of your screen).
- Choose About This Mac (or on some newer versions: System Settings → General → About).
- Note your macOS name/number (example: Ventura 13, Sonoma 14, Sequoia 15, etc.).
Why this matters: Starting with macOS Ventura, Apple renamed System Preferences to System Settings and redesigned the layout. If a tutorial says “System Preferences,” you may be on an older version, or you’ll just need to translate the wording.
2) macOS: Menu bar, Control Center & Dock
macOS has three big “navigation zones” you’ll use constantly:
- Menu bar (top of the screen): Shows the active app’s menus on the left, and status icons on the right (Wi-Fi, battery, time, etc.).
- Control Center (top-right): Quick toggles like Wi-Fi, Bluetooth, sound, display, and more (similar idea to Windows quick settings).
- Dock (usually bottom): Your app launcher + running apps + Downloads + Trash.
The Apple menu () is in the top-left. It’s not your app list like the Windows Start menu. It’s mostly for core system actions: Sleep, Restart, Shut Down, Lock Screen, and System Settings.
Windows habit that works on Mac: When in doubt, right-click. On a trackpad you can usually right-click by clicking with two fingers (or enable “Secondary click” in Settings).
3) Spotlight Search
Spotlight is macOS search. It can find apps, files, folders, emails (depending on your setup), settings, and more. If you learn only one thing from this macOS beginner guide, make it Spotlight.
- Click the magnifying glass in the menu bar, or
- Press Command (⌘) + Space
Type what you want (example: Safari, Downloads, a document name), then press Return/Enter to open the top result.
My honest recommendation: Learn Spotlight early. Many Mac power users barely “browse folders” anymore—Spotlight is faster for 90% of daily work.

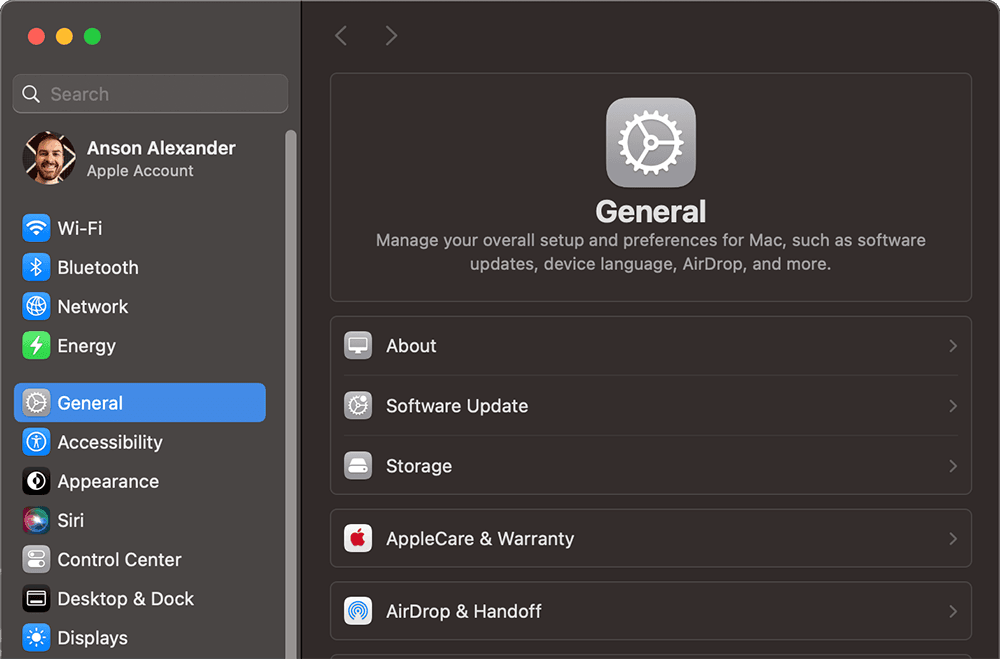
4) System Settings (“Control Panel” for Mac)
System Settings is where you customize macOS: Wi-Fi, Bluetooth, notifications, sound, displays, privacy, trackpad/mouse, and more.
- Go to Apple menu → System Settings
If you’re following older tutorials, you may hear System Preferences. That’s the older name. The idea is the same.
Fixing right-click (secondary click) in macOS
If right-click isn’t working the way you expect:
- Open System Settings
- Click Trackpad (laptops) or Mouse (desktops / external mouse)
- Enable Secondary click (and choose “Click right side” or “Click with two fingers”)
Natural scrolling (Windows switcher setting)
Many Windows switchers notice scrolling feels reversed at first. You can change it:
- System Settings → Trackpad or Mouse
- Toggle Natural scrolling on/off until it feels right for you
Three System Settings areas beginners should know
- General: Software Update, Storage, Login Items
- Desktop & Dock: Dock size, magnification, auto-hide, window behavior
- Privacy & Security: App permissions, location services, download/security prompts
5) Finder Basics: Files and Folders
Finder is the macOS equivalent to Windows Explorer. It’s always running in the background and it’s how you browse files and folders. Click the Finder icon in the Dock (it looks like a blue smiling face) to open a Finder window.
Finder basics you should learn first
- Sidebar locations: Desktop, Documents, Downloads, iCloud Drive, Applications
- Views: Icon, List, Column (hierarchy), Gallery
- Quick Look: Select a file and press Spacebar to preview it instantly
Beginner win: Use Downloads as your “catch-all” for new files, then move important stuff into Documents (and create folders inside Documents). It keeps your Mac cleaner without overthinking it.
Finder views (Icon, List, Column, Gallery)
In any Finder window, use the view buttons near the top to switch how items are displayed:
- Icon view: Great for apps and visual browsing
- List view: Best when you care about names, dates, and sizes
- Column view: Great for drilling down through folders quickly
- Gallery view: Useful for photos/videos and visual file selection
Quick Look (Spacebar preview)
Select a file in Finder and press Spacebar. You’ll get an instant preview (images, PDFs, many documents, and more). This is one of the fastest “Mac” workflows you can learn (and it fits perfectly with this macOS beginner guide).
Advanced Finder search (optional, but worth it)
If you want to get really fast at finding files, Finder has powerful tools like search filters, Smart Folders, tags, and more. Here’s my full tutorial that shows the best techniques step-by-step:
Customize Finder so it feels less confusing
Two tweaks that help beginners feel “grounded”:
- Show your drive on the Desktop
In Finder, open Finder → Settings → General, then enable Hard disks (and optionally external disks). This gives you a “C drive” style entry point. - Show file extensions
In Finder Settings → Advanced, enable Show all filename extensions so you can clearly see .pdf, .docx, .png, etc.
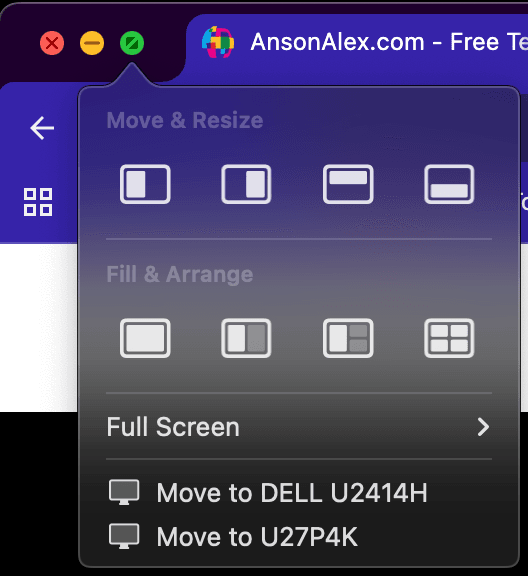
6) Mac Window Management (Close vs Quit, Minimize, Full Screen & Tiling)
The three window buttons on the top-left can confuse new users, especially coming from Windows:
- Red: closes the window (but often does not quit the app)
- Yellow: minimizes the window to the Dock
- Green: full screen or window tiling options (depending on macOS/app)
Key difference vs Windows: Closing a window (red button) usually does not quit the app. To quit an app, use Command (⌘) + Q or the app menu (example: Safari → Quit Safari).
Useful Mac window shortcuts
- Quit app: ⌘ + Q
- Close window/tab: ⌘ + W
- Minimize: ⌘ + M
- Spotlight search: ⌘ + Space
- Switch apps: ⌘ + Tab
Split view / tiling: On newer macOS versions, hover over (or long-press) the green button for tiling options like left/right. If you don’t see the exact same options, it’s usually just a version difference (or the app doesn’t support it fully).
7) Installing Apps Safely on macOS
There are two common ways to install apps on macOS:
- Mac App Store: Apple’s official store (curated, easy updates, purchases tied to your Apple ID)
- Direct download: From an app’s official website (common for Chrome, Zoom, etc.)
App Store
The App Store provides a safe place for users to download software and games for macOS. Apple has strict approval policies for apps published to the App Store. Many apps are free, and others can be purchased.
A nice benefit is that purchases are attached to your Apple account, so you can often reinstall purchased apps later on another Mac using the same Apple ID.
Downloading apps from the web (DMG files)
Many Mac apps install using a .dmg file (disk image). The common workflow looks like this:
- Download the installer (often a .dmg)
- Open it, then drag the app into the Applications folder (if prompted)
- Eject the installer “disk” from the Desktop/Finder when finished
Safety rule: When downloading apps outside the App Store, use the developer’s official site whenever possible (not random download mirrors).
8) Web Browsing on Mac: Safari vs Chrome vs Firefox
Safari is Apple’s built-in web browser on macOS. It’s fast, efficient, and integrates well with iPhone/iPad features like passwords and bookmarks syncing.
Like most modern browsers, Safari supports tabs, bookmarks, and a reading mode. If you use iPhone, Safari sync can be a big convenience.
If you prefer Chrome or Firefox (especially if you want the same browser across Mac/Windows/Android), you can install them and even set one as your default browser in System Settings.
9) Your First Week on Mac (learning path)
If you’re brand new, here’s the simplest path to getting comfortable fast:
- Learn Spotlight (⌘ + Space) and use it daily to open apps and find files.
- Customize your Dock: remove apps you won’t use, and keep the ones you will.
- Get your file routine: use Downloads → move important files into Documents folders.
- Learn close vs quit: closing windows isn’t quitting (⌘ + Q quits).
- Explore System Settings: Trackpad/Mouse, Desktop & Dock, Privacy & Security.
Legacy Mac Tutorials
If you haven’t upgraded to macOS yet and are still using an older version of Mac OS X, one of the tutorials below should look more similar to your setup.
This tutorial was published in 2019 and is a full Mac tutorial being shown on macOS 10.5 Catalina.
This tutorial was recorded in 2014 using Mac OS X 10.9 Mavericks and should be helpful for those on any Mac computer with software from 2017 or before:
After watching these tutorials users should feel comfortable navigating throughout the macOS system. Users should be able to create and delete folders, access the App Store and browse the web with Safari.
I plan on continuing to update and improve upon this macOS beginner guide and I’m always open to suggestions for future tutorials.
If you’d like to learn more, I’ve created a macOS playlist on YouTube containing dozens of useful tutorials.
Frequently Asked Questions
On macOS, the red button usually closes just the window. The app can stay running (you’ll still see the app name in the top-left menu bar). To fully quit, use ⌘ + Q or the app menu.
For most people, it’s Spotlight (⌘ + Space). Start with Spotlight first, then use Finder folder browsing when you need to dig deeper. For more precision, use Finder search filters (Command ⌘ + F) and Smart Folders.
It’s called System Settings (older versions call it System Preferences). You’ll find it in the Apple menu.